ADG series high-speed CNC lathe is a major special product of CNC machine tools. The development of this product has greatly promoted the production efficiency, reduced cutting force, improved part processing precision and surface quality, and reduced production cost. The processing effect of “taking the carâ€. The cutting force generated by high-speed cutting generally acts on the bed, and the bed is subjected to a large force; and the high speed also generates a large additional inertial force acting on the bed, so the bed needs sufficient rigidity. At the same time, in order to ensure the high speed and high precision of the machine tool, the bed must have high manufacturing precision and stability.

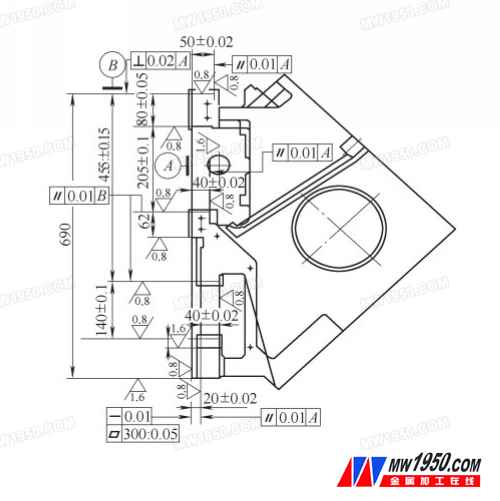
Two-dimensional processing drawing of the bed rail part
Taking the ADG25 bed of high-speed CNC lathe (see the photo) as an example, the processing process is studied, and the difficult problems in the bed processing are analyzed and researched to develop a reasonable processing plan. In order to ensure the quality of the bed processing, increase productivity.
1. Parts drawing technical analysis
The bed material is HT300 and the castings are made of resin sand. The bed part is designed as a 45° split slant bed, and the movement between the saddle and the tailstock body is matched by a sliding guide rail. The main technical requirements are as follows:
(1) Castings shall not have casting defects such as blisters, pores, shrinkage, cracks, etc. The castings shall be aged 180-240HBW.
(2) The main guide surface requires a flatness of 0.02 mm, a parallelism of 0.01 mm for each side, and a verticality of 0.01 mm for the adjacent surface.
(3) The plane of the tail rail requires a flatness of 0.02 mm, a parallelism of 0.01 mm for each side, and a verticality of 0.01 mm for the adjacent surface.
(4) The flatness of the joint surface of the headstock box is 0.02 mm, and the parallelism with the main guide surface is 0.01 mm.
(5) Parallel parallelism of the Lead Screw motor base and bearing housing with the main guide surface is 0.01 mm.
(6) The quenching hardness of the main guide surface and the end rail surface is 52 to 58 HRC, and the surface roughness value Ra is 0.8 μm.
2. Analysis of processing points
Through the analysis of the structure and technical analysis of the bed parts, it can be seen that the main and auxiliary rail faces of the bed have high dimensional tolerance requirements and dimensional accuracy requirements, while the head joint surface and the bearing seat mounting surface of the support Screw are The accuracy requirements are based on the guide rail surface, so the accuracy of the guide rail surface is the key to the bed processing. The surface of the guide rail requires quenching of 52 to 58 HRC. Eliminating the quenching deformation and ensuring the accuracy and stability of the bed are the main problems in the processing of the bed. Therefore, it is necessary to study the processing technology to ensure the processing quality of the bed. By optimizing the process design, the deformation of the bed is minimized and the desired effect is achieved.
Lead Screw
Lead Screw, Precision Lead Screw, Lead Ball Screw
Novelty Trading Development Co.,Ltd , http://www.novelty-hardware.com